Back to Swarf Page
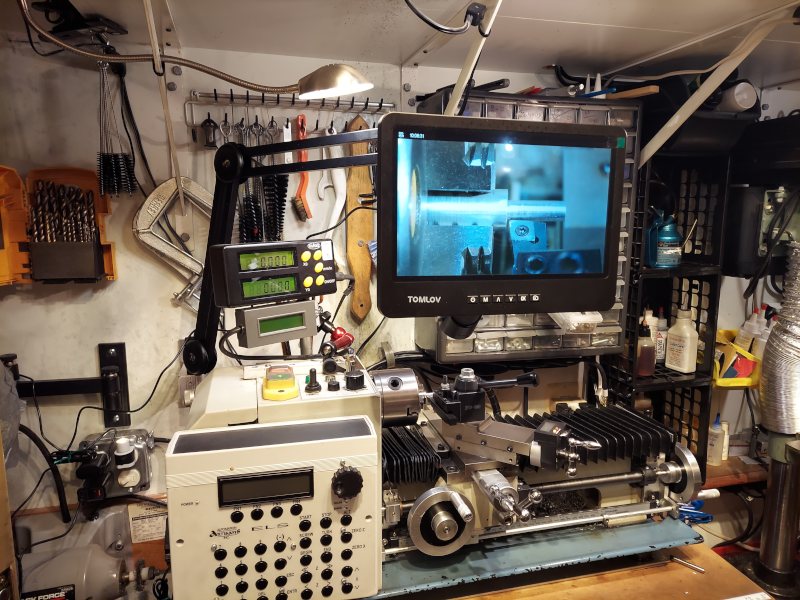
LMS 4100 Lathe Mods


Added:                                                   
- Machined out the cross slide for adding a 1.1" spacer.
- Hand crank for lead screw
- Split Lead Screw - allows the lead screw to freewheel when using the hand crank
- DRO for X and Z using standard SPC scales and a Shars 2 line reader head - 
    Click here to see mods required to allow for powering of the scales
- Work stop for Z that's easy to get to during a job
- Hinge for gear cover
- Flexible indicator holder for truing
- Mounting for tach and DRO head - used EMT tubing
- Bellows for way covers - see here for more photos


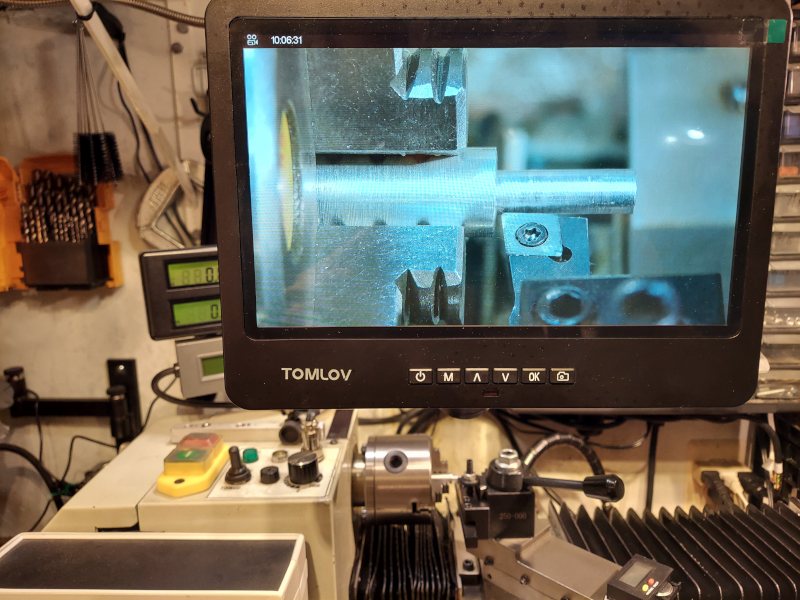
Lathe microscope - click for larger images

Also added an Auto Artisans E-Leadscrew - just f'ing badass.

E-Leadscrew Fab drawings for Hammond 1598D enclosure: and mountings:

http://www.ajawamnet.com/ajawam3/swarf/els-fab.pdf

No more gears - no more mess.
Cuts any thread - Imperial, Metric, Alien Sex Toy machine,
- it don't matter. And does it well.


Simple to set up and run - see the vid here on Youboob:


3D view of lathe with ELS on Youboob:


Tailstock DRO
PDF of the parts - Click image below for PDF


Previous mods:


Links to fab drawings of the other mods, 3D EDWG:
PDF's of the parts and overall assembly:
http://www.ajawamnet.com/ajawam3/swarf/Lathepartsoverview.pdf
http://www.ajawamnet.com/ajawam3/swarf/FAB_PARTS_LATHE.pdf

Edwgs ( the zip has the built in EDWG viewer):
http://www.ajawamnet.com/ajawam3/swarf/lathetopassy.EASM
http://www.ajawamnet.com/ajawam3/swarf/lathetopassy.zip

This thing is a pleasure to work with. No issues with crap on the ways, accurate cutting of stuff on the fly, repeatable stops on the fly, typical annoyances gone. Cuts clean passes; the QCTP from Tormach works well.

Click any picture for a larger version


A better method for mounting the Crossslide Scale - it allows a bit of freedom of movement
and still maintain a solid attachment to the vertical crossslide bracket:


It's a booted ball joint  from a sewing machine foot pedal linkage. Came with the BLDC motor I'm mounting on the Maxnc...


Shars Reader Head Mod to Allow for Scale Powering

I noticed that the head didn't power the scales - it still required an LR44 in each. I noticed the reader head had the circuitry to do it but it was not populated.

So I attempted to just power it off of the internal -5VDC 7660 (via a -1.55 VDC linear reg) they have on-board. I experienced power down/up issues with the scales, sometimes freezing, other times not even being recognized by the reader head.

A bit of research and I found this is a common issue; I read a bit on the guy's site  that wrote a user guide for the Shumatech;  also saw where someone was adding an SMT tantalum, going to the trouble of making it fit the existing coin cell compartment on the scales. A lot of people felt it was a noise issue.

So I did a bunch of testing and found out that it's actually a power up event issue with the tiny microcontrollers in the scales - a common problem. Back in the day, Microchip had an app note concerning the required power-up rise time/min off voltage for their line of PIC microcontrollers. Most modern uC's, such as the Atmels (what Arduino uses) have Brown Out Detection and more sophisticated on-board power on reset circuitry.


I realized that the scales use flea power and measured the voltage on the scale's -V rail during a power down. Indeed, they held a slight charge when external power is removed; took a while for it to get near 0V. If you ever pull the coin cell out of a scale when the display is on (they never really shut off, just blank the display), you can see the display gets a bit weird as the little uC loses its mind.

The people that made these display heads for Shars and other catalog houses even went as far as to place two mechanical PCB mount relays to disconnect the scale's data/clock lines so as to not parasitically power the reader head with the scale coin cell when the display is shut off...

So I modified it with the bare PCB shown - http://www.ajawamnet.com/ajawam3/shars2linescalepowermod.jpg . The green board (with the aforementioned yellow relays) is the original Shars' display PCB; the copper looking one is the one I did (CNC'd)

When the display head is powered off, the white relays on my PCB disconnect the -1.55VDC to the scales and short out the leads to the scale power pins to bleed off any voltage left.

I derived my own -5VDC using an LT1054 inverter (using U2 - scales are a positive ground) for input to the 337 regulator (U1)... just used the 5V supply from the Shars' wall wart (post Shars' pwr switch).  The LT is regulated as well as having a bit better performance.I didn't want to load down the on-board -5VDC 7660 (older inverter IC) they had in there.

Now, with power on/off cycles it never fails or gets stuck. I tried a simple bleed resistor between the scales  -V and GND but it failed to get it to fully reset all the time unless I used a very low value resistor. Since those inverters don't supply a whole lot of current, I went with the relay design.

 Click the image to see full size

Did a few dozen power up/down cycles - no more frozen scales

Link to PDF of schematic and PCB layout:
http://www.ajawamnet.com/ajawam3/swarf/dropwr.pdf
Single layer PCB only drills were to match the mounting in the Shaws head. All SMT... done on my CNC machine

Check out this link to a vid:
http://www.ajawamnet.com/ajawam3/swarf/DSCN2478.wmv
It works.... you really have to get those scales power rails to 0V...
The autofocus on the camera sucks...

ALSO - here's who makes the Shars head:
http://www.guanglu.com.cn/


NOTE: you must pay attention to grounding. In my case with the BLDC drive, I had to bond the Shars wall wart neg terminal (the reader head is neg ground; the scales the standard pos ground). I used Rad Shack under-carpet speaker wire (makes a nice insulated RF ground strap when you separate them). Also added straps to the scales and added braid shielding to the scale leads (no shield in the cables I got).

Also note that I clipped off the crappy scale wire connectors and soldered directly to the scale fingerstock; hot glue for the strain relief.
Click the image to see full size

Magnetic way covers for mini lathe:


Chuck nut holder
Got tired of that real quick...


Large Steady Rest
Had a recent client that wanted a tube cut. Ended up making a large steady onthe CNC; I used the fingers/bearing from the smaller LMS steady
PDF File of the parts (minus the fasteners - standard 1/4 x 20) - http://www.ajawamnet.com/ajawam3/swarf/LGSTEADY-ASSY.pdf
Links to vids of it being cut on the CNC:
http://www.ajawamnet.com/ajawam2/DSCN2714.wmv
http://www.ajawamnet.com/ajawam2/DSCN2717.wmv
http://www.ajawamnet.com/ajawam2/DSCN2718.wmv


LMS 2" Steady Rest


LMS/Tormach 0XA QCTP
Fits nice on the 7x.... The arm is a tool height setter mounted on a small mag indicator base.


3/8" tool sits below center of the dovetails but with room to spare. This compound base has the Early mods for the holes but is NOT milled down.


A 1/2" tool blank just fits .... Most of the tools I make usually have some relief on the top so there's usually  a bit more room


I purchased and considered using a milled down (by 1/4") Early modded compound base. The 1/2" tool had more room, but since I mainly use 1/4" lathe tools
I'd need to add shims to all 20 toolholders I have with specialized 1/4" tools.
I also noticed that the cutoff 007T (Tormach straight) holder would no longer hit center if I dropped the 0XA down 1/4" with the milled base.

So for now I'll stick with the standard height, Early modded compound base.


1/8" Tool Holder:

Just a piece of 5/16 keystock from Tractor Supply; grooved with an 1/8" 2 flute endmill


Scissors Knurling Tool Modification
I usually end up having to knurk close to the chuck. I ran into some issues with the stock knob getting close to the chuck jaws on some jobs. So I replaced the stock screw and pivots with
and fabbed a knurled knob. The knurl on the new knob was done with this scissors tool


Spindle Workstop
Similar to the Taig depth stop for the spindle. This is just two bicycle handlebar nuts, one tapped for typical lamp style 1/8" NPSC and the other bored to allow the wedges to lock in the spindle.
An aluminum spacer and modified 1/8" pipe coupling (re-tapped from NPT to NPSC) press the tapered handlebar nuts together and secures inside the spindle bore quite nicely.
The lamp rod allows a 1/4" x 20 allthread thru so I welded a 1/4x20 coupler to the end and set it with a plastic wing nut from Lowes. I can then adjust the stop to whatever depth I need.
It's easy to make various tips to fit the 1/4" all thread for different applications


Custom Chuck Keys

Some custom chuck keys I've made - I use Cherry Red to get the working ends a bit harder...


This I made to allow me to get to both sides of the 4 jaw - one with the small stock key and this one. Makes centering with an indicator
a lot easier...


This one I made for my 5C Bison, to go onto a
power screwdriver with extension. 5C's have lots of thread.


Swarf Shields
Click for larger image


Chuck Holder
Click for larger image

Video here:  https://www.youtube.com/watch?v=FYnfx2uHgPU

I made a set of these to make it easier and safer to change chucks.  

With a chuck that  has studs and nuts that mount on the back of the spindle flange, (see the nut holder in the section above this one -  http://www.ajawamnet.com/ajawam3/swarf/lathe_mods.html#chucknutholder) it got silly trying to hold the chuck in place and then use the nut holder, get it in position, then try to keep from cross threading, dropping the nut, or (heaven forbid) dropping the chuck.  I have a 3D printer and thought huh, this should work.

As I thought it through, I realized I might want to be able to adjust it slightly.  I used the killer 3D model of a 7x lathe that I had gotten a while ago (see my other mods on this page) but still was a bit leary of printing something that might not align.

So I incorportated holes I tapped for 8-32 set screws (Home Depot 8-32 x 0.25").  I use PETG filament on the 3D and it taps fairly well.  

No more battling chuck change outs.  Fits my 5C adapter too.  Note the bottom view where you can see the set screws and the guide fin that fits the slot in the bed.

Here's links to the STL files if anyone wants to 3D print them. Note that if you use Cura you may have to scale up 2540 in all three axis ...

Hope you find it usefull - might save your chuck, lathe bed, or toes...

For 3 Inch/80mm chuck
For 4 inch/100mm chuck
For 5 inch/125mm chuck

STEP files for those that want to mod them:
For 3 Inch/80mm chuck
For 4 inch/100mm chuck
For 5 inch/125mm chuck


Back to Swarf Page